Web services

Practice for Week 10

In this exercise, you will create a web service and a client that consumes a web service.

You will create a simple social "game". The idea of the game is that you can compose a short text message. You upload it to the server and in return you will receive a random response (i.e., the previous message that was uploaded by some other user).

For simplicity, you will use a Web Application project, rather than an Enterprise Application.

Create a new web application named "Week10-server":

  1. Select the project type "Web Application" in the "Java Web" category
  2. Enter the project name "Week10-server" (be sure that the project is being created in your NetBeansProjects folder, and not a folder such as NetBeansProjects\Week9)
  3. Use the GlassFish Server but do NOT add the project to an enterprise application
  4. Do not enable any frameworks

Domain Logic

First, implement the business methods.

Create two new Java classes in the au.edu.uts.aip.swap.domain package. Name them SwapBean and Message.

Use the following source code.

SwapBean.java:

package au.edu.uts.aip.swap.domain;

import java.util.*;
import javax.annotation.*;
import javax.ejb.*;

@Singleton
public class SwapBean {

    private Message currentMessage;

    @PostConstruct
    protected void init() {
        currentMessage = new Message();
        currentMessage.setMessage("Coding at Bondi Beach...");
        currentMessage.setTime(new Date());
        currentMessage.setLatitude(-33.890843);
        currentMessage.setLongitude(151.280056);
    }

    public Message swap(Message message) {
        Message result = currentMessage;
        currentMessage = message;
        return result;
    }

    public Message peek() {
        return currentMessage;
    }

}

Message.java:

package au.edu.uts.aip.swap.domain;

import java.io.*;
import java.util.*;

public class Message implements Serializable {

    private String message;
    private Date time;
    private double latitude;
    private double longitude;

    public String getMessage() {
        return message;
    }

    public void setMessage(String message) {
        this.message = message;
    }

    public Date getTime() {
        return time;
    }

    public void setTime(Date time) {
        this.time = time;
    }

    public double getLatitude() {
        return latitude;
    }

    public void setLatitude(double latitude) {
        this.latitude = latitude;
    }

    public double getLongitude() {
        return longitude;
    }

    public void setLongitude(double longitude) {
        this.longitude = longitude;
    }

}

Reflect

Why is SwapBean annotated with @Singleton? What does @PostConstruct mean?

Application Configuration

Configuration of a JAX-RS web service is by an application-supplied subclass of javax.ws.rs.core.Application.

Create a class called ApplicationConfig in a package named au.edu.uts.aip.swap.service:

package au.edu.uts.aip.swap.service;

import javax.ws.rs.*;
import javax.ws.rs.core.*;

@ApplicationPath("api")
public class ApplicationConfig extends Application {

}

The "api" in the @ApplicationPath means that the RESTful web service application will be available under the sub-path named "api".
i.e., http://localhost:8080/Week10-server/api/

Web Service

Finally, you can create a resource in your web service. Create a new class named SwapResource in the au.edu.uts.aip.swap.service package:

package au.edu.uts.aip.swap.service;

import au.edu.uts.aip.swap.domain.*;
import javax.ejb.*;
import javax.ws.rs.*;

@Path("swap")
public class SwapResource {

    @EJB
    private SwapBean swapBean;

    @GET
    public Message peek() {
        return swapBean.peek();
    }

    @POST
    public Message swap(Message message) {
        return swapBean.swap(message);
    }

}

When you save all files, NetBeans will detect that you've created a web service.

Deploy the project by right clicking on Week10-server and selecting deploy. 
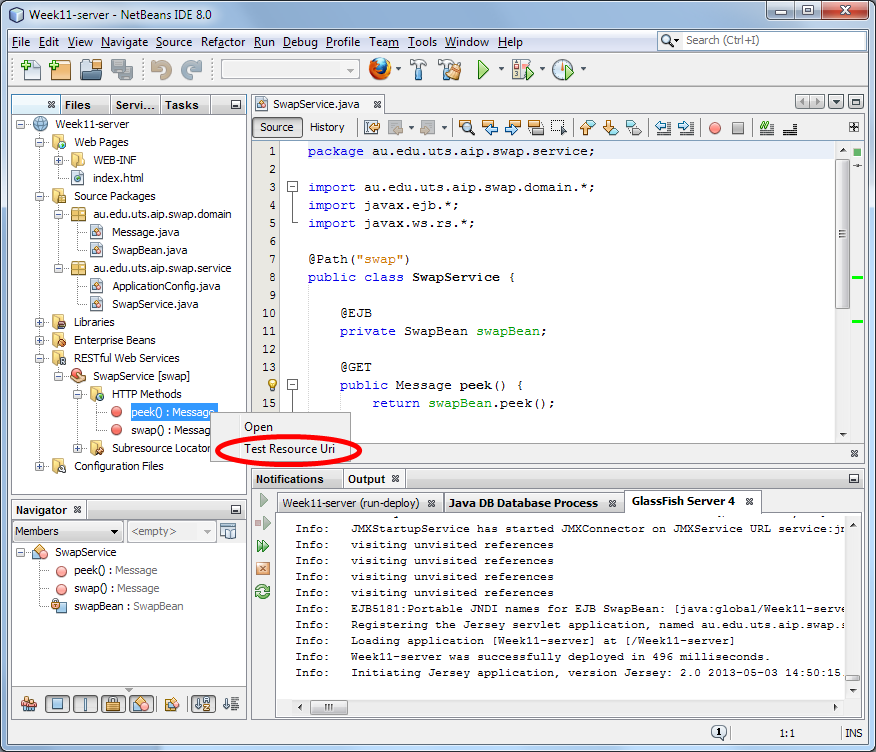
Once GlassFish has started and the application is deployed, you can test the web service by right-clicking on peek() in the RESTful Web Services 'folder' and choosing "Test Resource URI" (as shown in the image below).

Test REST

Your web-browser should open to an address such as the following:
http://localhost:8080/Week10-server/api/swap

A JSON (i.e., JavaScript) representation of the default message should be shown.

Reflect

Which HTTP method was used to invoke the web resource? (i.e., GET or POST?)

What method(s) of your Java code were invoked to service the request?

Why is swap in the address?
http://localhost:8080/Week10-server/api/swap

How often does JAX-RS create an instance of your SwapService class? Does JAX-RS follow the single-instance approach used by Servlets or does it use something else? Can you add some code to your project to check/confirm this?

In the previous exercise, you tested the web service using your web browser. While this is fine for testing the GET method, it can be difficult to test POST (and other HTTP methods) using a web browser.

cURL is a tool that can assist with testing web services.

Installing cURL

You may already have cURL installed on your computer. If you are using the lab computers, it is already installed.

Open a window to your console / command line. Type "curl" (without the quotes) and press enter.

You should see a message such as the following:

curl: try 'curl --help' or 'curl --manual' for more information

If you receive a message saying command not found or curl is not recognized, you will need to install cURL.

If you are using a unix-based system, you can install cURL using your package manager. You can also download cURL from the project homepage:
http://curl.haxx.se/

On Windows, you may wish to use these pre-compiled windows installers:
http://www.confusedbycode.com/curl/

Testing a GET method

The HTTP GET method is the easiest to test using cURL. Type the following command into your console / command line:

curl http://localhost:8080/Week10-server/api/swap

Your console should look something like the following:

> curl http://localhost:8080/Week10-server/api/swap
{"latitude":-33.890843,"longitude":151.280056,"message":"Coding at Bondi Beach...","time":"2016-10-14T10:58:05.522"}
>

You can see the full HTTP headers using -i:

> curl -i http://localhost:8080/Week10-server/api/swap
HTTP/1.1 200 OK
X-Powered-By: Servlet/3.1 JSP/2.3 (GlassFish Server Open Source Edition  4.0  Ja
va/Oracle Corporation/1.8)
Server: GlassFish Server Open Source Edition  4.0
Content-Type: application/json
Date: Tue, 14 Oct 2016 00:16:34 GMT
Content-Length: 109

{"latitude":-33.890843,"longitude":151.280056,"message":"Coding at Bondi Beach...","time":"2016-10-14T10:58:05.522"}
>

You can see everything using the -v (verbose) option:

> curl -v http://localhost:8080/Week10-server/api/swap
* Hostname was NOT found in DNS cache
*   Trying ::1...
* Connected to localhost (::1) port 8080 (#0)
> GET /Week10-server/api/swap HTTP/1.1
> User-Agent: curl/7.38.0
> Host: localhost:8080
> Accept: */*
>
< HTTP/1.1 200 OK
< X-Powered-By: Servlet/3.1 JSP/2.3 (GlassFish Server Open Source Edition  4.0
Java/Oracle Corporation/1.8)
* Server GlassFish Server Open Source Edition  4.0 is not blacklisted
< Server: GlassFish Server Open Source Edition  4.0
< Content-Type: application/json
< Date: Tue, 14 Oct 2016 00:37:04 GMT
< Content-Length: 79
<
{"latitude":-33.890843,"longitude":151.280056,"message":"Coding at Bondi Beach...","time":"2016-10-14T10:58:05.522"}*
 Connection #0 to host localhost left intact
>

Testing a POST method

Your swap(...) method accepts a Message object. JAX-RS will automatically convert the body of a POST message into an appropriate object.

Suppose you want to send the following message:

{"latitude":1,"longitude":2,"message":"Hello","time":"2016-12-25T00:00:01"}

This message is encoded in JSON (Content-Type: application/json), and we would use cURL like this:

curl -v -X POST -H <headers> -d <data> <url>

The data is: {"latitude":1,"longitude":2,"message":"Hello","time":"2016-12-25T00:00:01"} The header is: Content-Type: application/json

Thus, our command is as follows:

curl -v -X POST -H 'Content-Type: application/json' -d '{"latitude":1,"longitude":2,"message":"Hello","time":"2016-12-25T00:00:01"}' http://localhost:8080/Week10-server/api/swap

Note: on Windows, the single quote cannot be used for parameters. Instead, you use double-quotes and escape the inner double quotes):

curl -v -X POST -H "Content-Type: application/json" -d "{\"latitude\":1,\"longitude\":2,\"message\":\"Hello\",\"time\":\"2016-12-25T00:00:01\"}" http://localhost:8080/Week10-server/api/swap

Run the command. You should see the initial message as output. Run it again. The response should now be the previous message that you posted.

Generating XML

JAX-RS can also produce XML. In fact, it tries to generate XML before JSON.

To enable XML generation, just add the annotation @XmlRootElement to your Message class:

@XmlRootElement
public class Message implements Serializable {

Save your application and run the cURL commands again to see the response. This time, the data should be encoded in XML.

Accept Headers

The HTTP Accept header is used by a client (i.e., a web browser) to tell the server the preferred and supported content types that the client will accept.

JAX-RS can use the Accept header to choose between JSON and XML.

Compare the output of the following two commands:

curl -H "Accept: application/json" http://localhost:8080/Week10-server/api/swap
curl -H "Accept: application/xml" http://localhost:8080/Week10-server/api/swap

Reflect

What happens if you remove the @XmlRootElement but request an XML document using the "Accept: application/xml" header?

Why might the Accept header be useful? i.e., Why might it be helpful for the same URL to return two different outputs depending on the header?

Why do the GET and POST methods use the same URL? How could it be changed so that the different operations use different URLs? (Hint: you could use something like @Path("peek") and @Path("swap") on the methods in the SwapResource file).

In this exercise, you will customize the configuration of the XML/JSON bindings.

If you changed the paths during the Reflection questions of the previous exercises, please revert those changes.

i.e., the GET and POST methods should still be at http://localhost:8080/Week10-server/api/swap

Custom Element Names

In your Message class, annotate the getLatitude method with @XmlElement(name="lat") and the getLongitude method with @XmlElement(name="long").

Use cURL to generate XML and JSON output.

How has the XML and JSON output changed from before?

JAXB provides many annotations, enabling you to configure whether class attributes should be converted into XML elements, attributes or values. You can also customize the naming and other XML features.

For now, we will just use lat and long.

Reflect

Why might you want the XML element names to be different from the property names of the Java class?

For this exercise, you'll need to download a single-page web-app that uses the RESTful API we've just created.

Right click on the link above and save the file to your computer.

This app uses Geolocation services but if Geolocation isn't working (e.g., in the lab computers) then it will just default to the Sydney Opera House.

This web-app turns your web-browser into a fully independent client of the web-service. RESTful web services may be used from within JavaScript applications using "AJAX" (asynchronous JavaScript + XML).

Just save it to the "Web Pages" (or "Web") folder of your Week10-server project. Run it by right clicking on the file in NetBeans and selecting Run.

Note that to work properly you need to have completed the step earlier where @XmlElement(name="lat") and @XmlElement(name="long") annotations are added to the Message class.

In theory, you could also build an Android, iPhone or Windows Phone app as a client for the web service. Perhaps the attached web-app could be converted to a native application using Cordova.

In this exercise, you will create a JAX-RS client, similar to the web-app, that accesses the RESTful web service that you created.

Create a new project named Week10-client:

  1. Select the project type "Web Application" in the "Java Web" category
  2. Enter the project name "Week10-client" (be sure that the project is being created in your NetBeansProjects folder, and not a folder such as NetBeansProjects\Week9)
  3. Use the GlassFish Server but do NOT add it to an enterprise application
  4. Add the JavaServer Faces framework to the application.

Remember to also add the Java EE 7 API Library to the project.

Create Project Files

The JAX-RS client is able to use the same classes that we used to define the service. In this example, you could use the same class, au.edu.uts.aip.swap.domain.Message, in both the client and the server.

If you wanted to do this in a well-principled manner, you might create a "Java Class Library" project in NetBeans. The class library could contain common classes that are reused by both projects. However, for the purposes of this exercise and to prove that the client and server are decoupled, you can just create a new class instead of using a class library.

Create a Java class named SwapMessage in the au.edu.uts.aip.swap.web package.

The source code for SwapMessage will be very similar to the Message class you created in the Week10-server project. The difference is in the package name, the class name and the name in the XmlRootElement annotation.

package au.edu.uts.aip.swap.web;

import java.io.*;
import java.util.*;
import javax.xml.bind.annotation.*;

@XmlRootElement(name = "message")
public class SwapMessage implements Serializable {

    private String message;
    private Date time;
    private double latitude;
    private double longitude;

    public String getMessage() {
        return message;
    }

    public void setMessage(String message) {
        this.message = message;
    }

    public Date getTime() {
        return time;
    }

    public void setTime(Date time) {
        this.time = time;
    }

    @XmlElement(name = "lat")
    public double getLatitude() {
        return latitude;
    }

    public void setLatitude(double latitude) {
        this.latitude = latitude;
    }

    @XmlElement(name = "long")
    public double getLongitude() {
        return longitude;
    }

    public void setLongitude(double longitude) {
        this.longitude = longitude;
    }

}

Add two JSF pages to your application: compose (compose.xhtml) and receive (receive.xhtml):

compose.xhtml:

<?xml version='1.0' encoding='UTF-8' ?>
<!DOCTYPE html PUBLIC "-//W3C//DTD XHTML 1.0 Transitional//EN" "http://www.w3.org/TR/xhtml1/DTD/xhtml1-transitional.dtd">
<html xmlns="http://www.w3.org/1999/xhtml"
      xmlns:h="http://xmlns.jcp.org/jsf/html">
    <h:head>
        <title>Text Exchange</title>
    </h:head>
    <h:body>
        <h1>Text Exchange</h1>
        <h:form>
            <p>
                <label>Enter a poetic message:
                    <h:inputTextarea value="#{swapController.request.message}"/>
                </label>
            </p>
            <p>
                <label>Your Latitude:
                    <h:inputText value="#{swapController.request.latitude}"/>
                </label>
            </p>
            <p>
                <label>Your Longitude:
                    <h:inputText value="#{swapController.request.longitude}"/>
                </label>
            </p>
            <h:commandButton value="Share with a Stranger" action="#{swapController.swap}"/>
        </h:form>
    </h:body>
</html>

receive.xhtml:

<?xml version='1.0' encoding='UTF-8' ?>
<!DOCTYPE html PUBLIC "-//W3C//DTD XHTML 1.0 Transitional//EN" "http://www.w3.org/TR/xhtml1/DTD/xhtml1-transitional.dtd">
<html xmlns="http://www.w3.org/1999/xhtml"
      xmlns:h="http://xmlns.jcp.org/jsf/html"
      xmlns:f="http://xmlns.jcp.org/jsf/core">
    <h:head>
        <title>Text Exchange</title>
    </h:head>
    <h:body>
        <h1>Text Exchange</h1>
        <h:form>
            <p>
                Message from a Stranger:
            </p>
            <p>
                #{swapController.response.message}
            </p>
            <p>
                (Sent:
                <h:outputText value="#{swapController.response.time}">
                    <f:convertDateTime pattern="yyyy-MM-dd'T'HH:mm:ss.SSSZ"/>
                </h:outputText>)
            </p>
            <p>
                Their Latitude: #{swapController.response.latitude}
            </p>
            <p>
                Their Longitude: #{swapController.response.longitude}
            </p>
            <h:button value="Compose Another" outcome="compose"/>
        </h:form>
    </h:body>
</html>

Create a JSF backing bean named SwapController in a package named au.edu.uts.aip.swap.web:

package au.edu.uts.aip.swap.web;

import java.util.*;
import javax.enterprise.context.*;
import javax.inject.*;

@Named
@RequestScoped
public class SwapController {

    private SwapMessage request = new SwapMessage();
    private SwapMessage response;

    public SwapMessage getRequest() {
        return request;
    }

    public SwapMessage getResponse() {
        return response;
    }

    public String swap() {
        // Set the time of the message to "Now"
        request.setTime(new Date());

        // For now, just show the request
        response = request;

        return "receive";
    }

}

Before proceeding, test the client application. It will not communicate with the server. However, the information you enter on the compose.xhtml view should appear on receive.xhtml when you click on the command button.

Reflect

Why did you use just @XmlRootElement to annotate Message in Week10-server but in Week10-client you use @XmlRootElement(name = "message") to annotate SwapMessage?

Using JAX-RS client

Now, you can modify the swap function to use the JAX-RS client API as demonstrated in the lecture notes (javax.ws.rs.client.Client).

See if you can use the lecture notes, and/or the weekly readings and/or the Java EE 7 tutorial on the JAX-RS client API to connect to Week10-server.

Hints

You will delete "response = request;" in SwapController and replace it with some other code.

The target of the client will be the web service: http://localhost:8080/Week10-server/api/swap

The parameter of the post method requires an Entity. You can create an entity using Entity.json(request) or Entity.xml(request).

Don't forget to close the JAX-RS client.

Reflect

What happens if you undeploy the Week10-server application and run the client? You can undeploy Week10-server by locating the application in the Services tab > Servers > GlassFish Server > Applications > Week10-server. Right click and then select Undeploy. You should get an exception in your client (Week10-client JavaServer Faces application). How could you handle the exception?

The SwapController class is a Controller in the "Model View Controller" design pattern. This means that it is part of the presentation logic. However, in a well designed application, calling the web service should probably not be in the presentation logic. This is because the details of the web service have nothing to do with presentation logic (i.e., is the web service RESTful? SOAP? local vs remote? what is the URL?). It, more rightfully, belongs in the domain logic or in a separate "integration layer". How might you modify the design of Week10-client to separate the presentation logic and the web service client?

The address of the web service might change. Rather than configuring the address in the Java code, it could be moved to a configuration file. How could you move the address of the web service into a configuration file (e.g., web.xml)?