In this exercise, we will create a very simple EJB that returns a greeting.
In previous lab exercises, we began by creating a "Web Application" project. This exercise is different. You will be creating an "Enterprise Application".
Create an Enterprise Application
In NetBeans, create a new project:
- In the "Java EE" category, select the type "Enterprise Application".
- Click "Next >".
- Enter the project name, "Week8" (without the quotes).
- Click "Next >".
- Use GlassFish as the Server and allow NetBeans to create EJB and web application modules (i.e., leave the checkboxes checked).
- Click "Finish".
You should have three projects appear in NetBeans:
- Week8. This project is your complete Enterprise Application. This project is used to create an EAR file that is deployed to your application server. An EAR file combines a WAR file (i.e., you web application) with a JAR file (i.e., your EJB application) into a single file.
- Week8-ejb. This project contains your Enterprise JavaBeans.
- Week8-war. This project contains your web application (i.e., Servlets, JSP, JSF and backing beans). This project depends on Week8-ejb.
In this exercise, you will be using JavaServer Faces, so you should add that framework to the Week8-war project:
- Right click on the "Week8-war" project and select "Properties".
- Click on the "Frameworks" category.
- Add JavaServer Faces to the project.
Also, remember to add the Java EE 7 API Library to the Week8-war project:
- While still in properties, select the "Libraries" category.
- Click on "Add Library..." (to add a compile-time library)
- Choose the "Java EE 7 API Library" and click "Add Library"
- Click OK to close the project properties
Important Tip
Java EE 7 allows you to deploy EJBs using a WAR or an EAR file. In NetBeans, this means that even though your Week8-war is only part of your Enterprise Application, you are still able to run Week8-war directly.
This can result in problems when/if the same EJB is deployed twice. I recommend only deploying or running your application via the Week8 enterprise application.
This means that if you want to run your project, you should NOT run individual JSF (xhtml) files. Instead, you should right click on, and run, the Week8 Enterprise Application. Avoid using the large green "play" button in NetBeans as it may not run the project that you are intending to run.
If you are experiencing problems with NetBeans and/or GlassFish, here are some steps you might try to resolve the problem:
- Deploy the Enterprise Application again. Right click on the Enterprise Application (e.g., Week8) and then click "Deploy".
- Undeploy all applications. In the Services tab, locate Servers > GlassFish Server > Applications. Right click on Applications to refresh the list. Select all the Applications with your mouse (hold down the shift key). Then right click and select "Undeploy".
- Restart GlassFish. If you are seeing error messages about NetBeans being unable to delete JAR files, then you should undeploy all applications and restart GlassFish. To restart GlassFish, in the Services tab locate Servers > GlassFish Server. Then, right click on GlassFish Server and select Restart (or Stop and then Start).
Create a UniqueIdGenerator Helper Class
As with the Week 7 lab exercises, you can use a UniqueIdGenerator class to understand when new objects are created.
Right click on the "Week8-ejb" project and select "New..." and "Other...".
Select the "Java Class" file type in the "Java" category. Name the class UniqueIdGenerator and use the package "au.edu.uts.aip.greeting.domain"
Enter the following Java code:
package au.edu.uts.aip.greeting.domain;

public class UniqueIdGenerator {

    private static int counter = 0;

    public static synchronized int generate() {
        counter++;
        return counter;
    }

}
Create an Enterprise JavaBean
Now you can create your first Enterprise JavaBean.
Right click on the "Week8-ejb" project and select "New..." and "Other...".
An EJB is an ordinary Java class with appropriate annotations or deployment descriptors. We will create an EJB manually.
Select the "Java Class" file type in the "Java" category. Name the class GreetingBean and use the package "au.edu.uts.aip.greeting.domain"
You could have automatically created a bean using the "Session Bean" type in the "Enterprise JavaBeans" category. However, for the purposes of this exercise we will create it manually.
Enter the following Java code:
package au.edu.uts.aip.greeting.domain;

import javax.ejb.*;

@Stateless
public class GreetingBean {

    private int uniqueId = UniqueIdGenerator.generate();

    public int getUniqueId() {
        return uniqueId;
    }

    public String getGreeting() {
        return "Hello, World!";
    }

}
Now, you can create a client for that EJB.
To the Week8-war project, add a new JavaServer Faces file named greeting (i.e., greeting.xhtml):
<?xml version='1.0' encoding='UTF-8' ?>
<!DOCTYPE html PUBLIC "-//W3C//DTD XHTML 1.0 Transitional//EN" "http://www.w3.org/TR/xhtml1/DTD/xhtml1-transitional.dtd">
<html xmlns="http://www.w3.org/1999/xhtml"
      xmlns:h="http://xmlns.jcp.org/jsf/html">
    <h:head>
        <title>Greeting</title>
    </h:head>
    <h:body>
        <p>
            The greeting is: <h:outputText value="#{greetingController.greeting}"/>.
        </p>
        <p>
            The unique id is: <h:outputText value="#{greetingController.uniqueId}"/>.
        </p>
    </h:body>
</html>
In the Week8-war project, also add a new Java class named GreetingController in the package au.edu.uts.aip.greeting.web:
package au.edu.uts.aip.greeting.web;

import au.edu.uts.aip.greeting.domain.*;
import javax.ejb.*;
import javax.enterprise.context.*;
import javax.inject.*;

@Named
@RequestScoped
public class GreetingController {

    @EJB
    private GreetingBean greeting;

    public String getGreeting() {
        return greeting.getGreeting();
    }

    public int getUniqueId() {
        return greeting.getUniqueId();
    }

}
Now, run the Enterprise Application. Do this by right clicking on the Week8 project (NOT Week8-war) and clicking Run.
Change the URL of your browser to http://localhost:8080/Week8-war/faces/greeting.xhtml and check the output.
Reflect
Obviously, we could have achieved the same effect without the complexity of EJBs. What might be some advantages to this complexity? Why might it be useful to have our EJBs and web application in separate projects?
Recalling the the Week 8 lecture, are we accessing the EJB via a "Local" or "Remote" invocation?
Have we created a Session Bean or a Message Driven Bean?
Is the bean Stateful or Stateless? What does this mean?
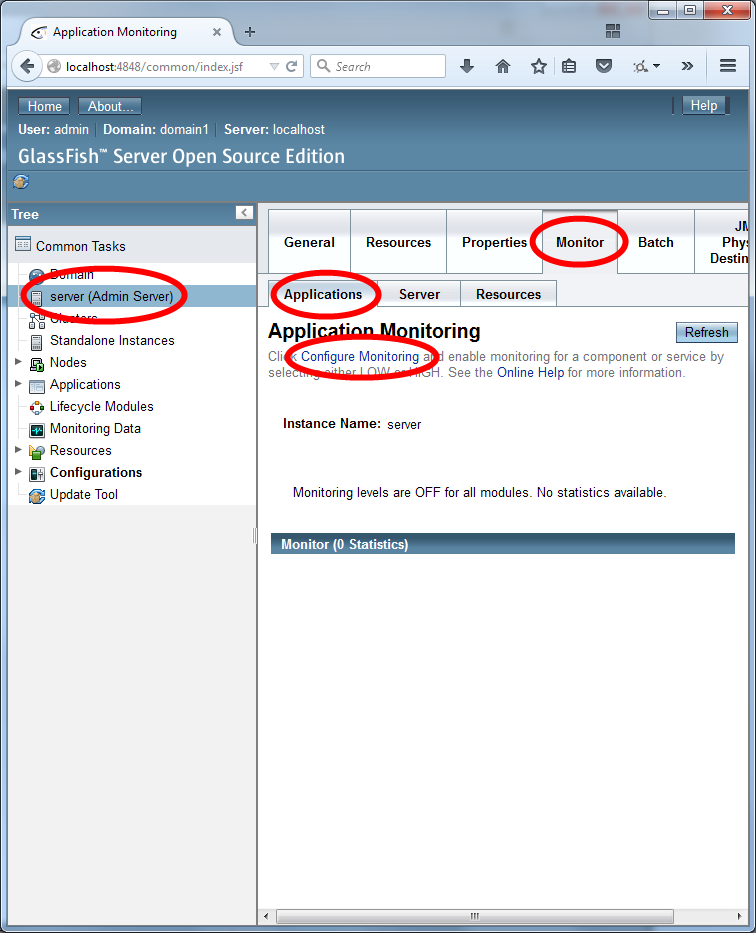
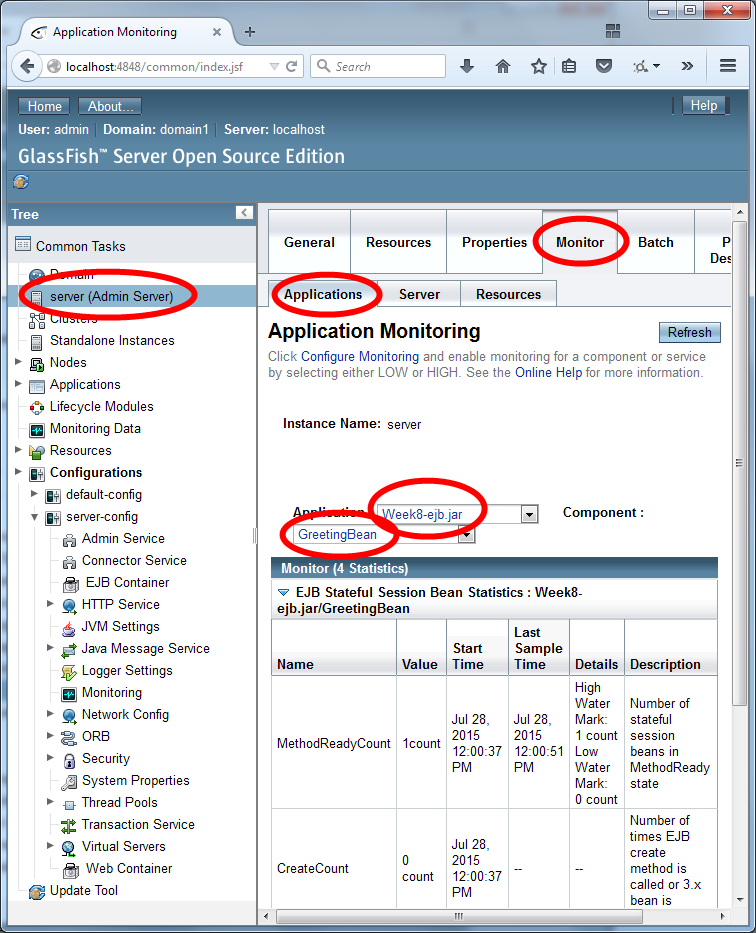
Why does the Unique Id stay the same when you refresh? What happens if you use a second browser, clear your cookies or launch "incognito mode" to start a new browser session? Why does the Unique Id still stay the same?
How could you "force" GlassFish to create new instances of the Session bean? (i.e., how can you get the UniqueId to change?).
How do things change if you use Singleton beans?
Hint
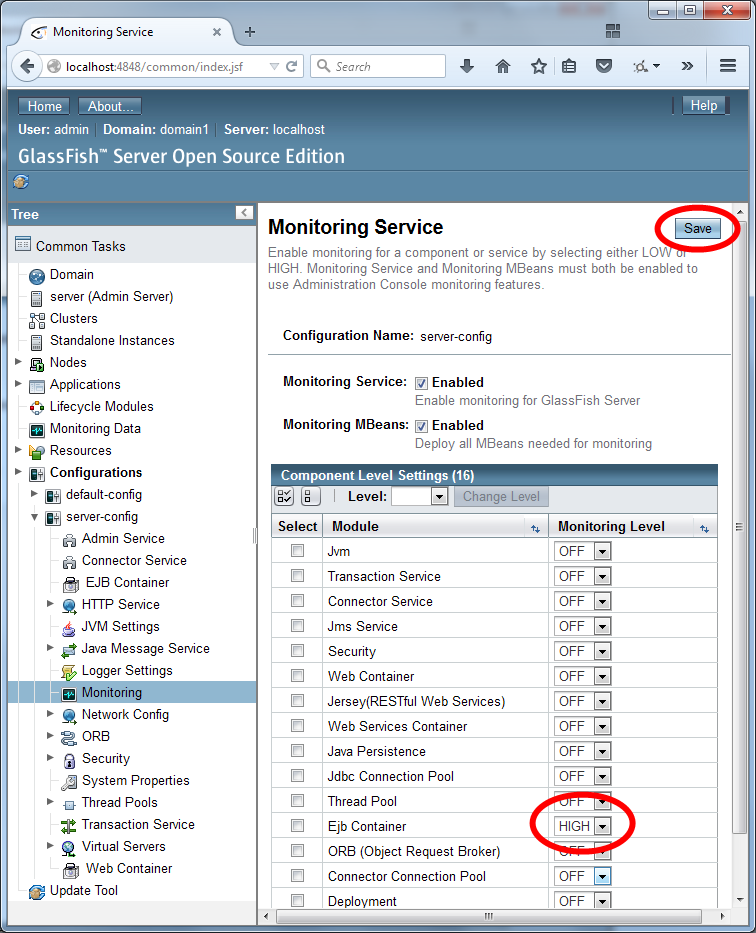
GlassFish will create additional session beans if the existing beans are "busy".
You can make the beans busy by slowing them down. Slow down the request handling by adding the following code to getGreeting of your GreetingBean:
try {
    Thread.sleep(5000); // wait for 5000 milliseconds (i.e., 5 seconds)
} catch (InterruptedException ie) {
    // do nothing
}
You should make this change and save the file. If you just refresh your browser window, you may receive an exception: "Exception attempting to inject ...". You will need to redeploy the Enterprise Application. Do this by right clicking on Week8 and selecting "Deploy".
Now that your Stateless Session bean runs slower, you can open two tabs at once and refresh both quickly. What does this tell us?
To change the session bean from stateless to singleton, modify your GreetingBean class as follows...
Change this:
@Stateful
public class GreetingBean {
into this:
@Singleton
public class GreetingBean {
(i.e., @Stateful becomes @Singleton)