Today's tutorial is quite long and may be challenging if you are unfamiliar with Java.
JavaServer Pages (JSP)
Practice for Week 3
JavaServer Pages (JSP) are very similar in purpose to Servlets. In fact, the application server will automatically compile a JSP into a Servlet.
The difference lies in which language is "on top":
- In a Servlet, you write Java and embed HTML inside Strings.
- In a JSP, you write HTML and embed Java code inside special tags.
We're not going to repeat all of the Week 2 lab exercises. However, everything we did during last week's lab session can be created again using JSP.
Create a JSP
If you are using the lab computers, your project from last week is still available. To access it, you just need to open it again (File... Open Project...).
However, this week we will start a new project:
- Create a new Project
- In the category "Java Web", select the "Web Application" project type
- Choose a name: Week3
- Ensure the Server is "GlassFish Server 4.1.1" and the Java EE Version is "Java EE 7 Web" (the context path is the address on the web-server that your application will be deployed to)
- Don't add any frameworks
- Create a new File (File... New File...)
- Select the "JSP" file type in the "Web" category
- Enter the filename "helloworld" (without quotes), on the same page check to make sure that the option "JSP File (Standard Syntax)" is selected
Replace the content of the generated JSP file with the following:
<%@page contentType="text/html" pageEncoding="UTF-8"%>
<!DOCTYPE html>
<html>
    <head>
        <title>Hello, World!</title>
    </head>
    <body>
        <h1>Hello, World!</h1>
        <p>
            <% out.println("Hello from Java inside a JSP"); %>
        </p>
    </body>
</html>
Run the Servlet and View the Source
Now, run the project. To run the project click the green play button. If you have other projects open, you may need to ensure that the Week3 project is selected (under Linux just click on the name of the project) or that the project is set as the main project (under Windows right click on the name of the project and the select "Set as Main Project").
When GlassFish has started, you should be able to open the JSP in your web browser.
http://localhost:8080/Week3/helloworld.jsp
When you access the JSP from your web-browser, the application server will automatically compile the JSP into a Servlet. With GlassFish and NetBeans you can see the source of the Servlet. Inside NetBeans, right click on your helloworld.jsp file and select "View Servlet".
The Java code for your Servlet will appear.
This code is a bit more complex than the Servlets we wrote last week. The code is complex because it is automatically generated. Fortunately, you don't have to worry about what is going on behind the scenes: we are only examining it so that you can convince yourself that JSPs are actually just an "easy" way to create a Servlets.
If you scroll down the Servlet code you will see something like:
     out.write("\n");
     out.write("<!DOCTYPE html>\n");
     out.write("<html>\n");
     out.write("    <head>\n");
     out.write("        <title>Hello, World!</title>\n");
     out.write("    </head>\n");
     out.write("    <body>\n");
     out.write("        <h1>Hello, World!</h1>\n");
     out.write("        <p>\n");
     out.write("            ");
out.println("Hello from Java inside a JSP");
     out.write("\n");
     out.write("        </p>\n");
     out.write("    </body>\n");
     out.write("</html>\n");
The HTML in our JSP has been converted into out.write statements. Our line of Java has been inserted into the Servlet at the correct place.
Using Expressions in JSP
Now modify your JSP page as follows:
<%@page contentType="text/html" pageEncoding="UTF-8"%>
<!DOCTYPE html>
<html>
    <head>
        <title>Hello, World!</title>
    </head>
    <body>
        <h1>Hello, World!</h1>
        <p>
            Five times five is <%= 5 * 5 %>
        </p>
    </body>
</html>
Run the Servlet and View the Source
Again, save the file (you do not need to click on the play button again) and refresh the JSP page in your web-browser:
http://localhost:8080/Week3/helloworld.jsp
What do you see?
Return to NetBeans and right click on the JSP to "View Servlet" again.
If you scroll down, you will see code such as the following:
out.write("\n");
out.write("<!DOCTYPE html>\n");
out.write("<html>\n");
out.write("    <head>\n");
out.write("        <title>Hello, World!</title>\n");
out.write("    </head>\n");
out.write("    <body>\n");
out.write("        <h1>Hello, World!</h1>\n");
out.write("        <p>\n");
out.write("            Five times five is ");
out.print( 5 * 5 );
out.write("\n");
out.write("        </p>\n");
out.write("    </body>\n");
out.write("</html>\n");
This time, our code "5 * 5" has been automatically wrapped in an out.print( .... ) statement.
Reflect
We have used two kinds of scripting elements:
<%     %>
<%=     %>
What is the difference between these elements?
Can you summarize the rules that Java uses to convert a JSP page into a Servlet?
In the next few exercises, we will construct an application using JSP. The application is a to-do list. It will store a list of tasks in the session.
We will implement the same application in three ways:
- Using a simple Model 1 architecture
- Using a Model 1 architecture, Beans (jsp:useBean) and the JSTL
- Using a Model 2 architecture and the JSTL
If you'd like to challenge yourself, you can work without the examples and hints given below. That is, you can stop reading here and implement the three separate techniques by yourself.
Here are screen shots of the final application we will build:
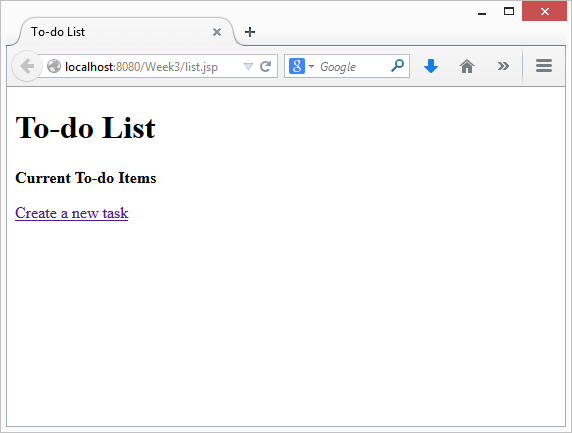
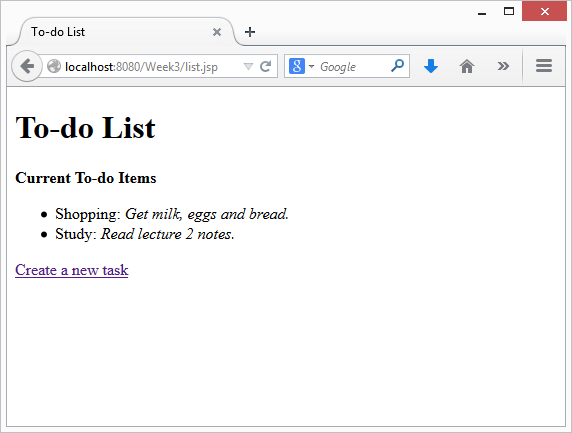
This is the first screen (list.jsp). The first time the user visits, there are no items in the to-do list:
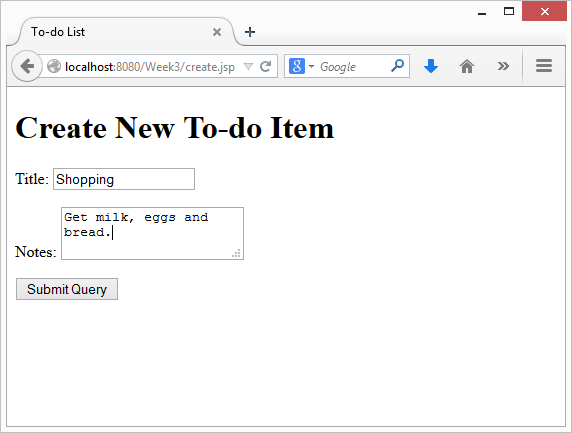
After clicking on "Create a new task", the user can add a new item:
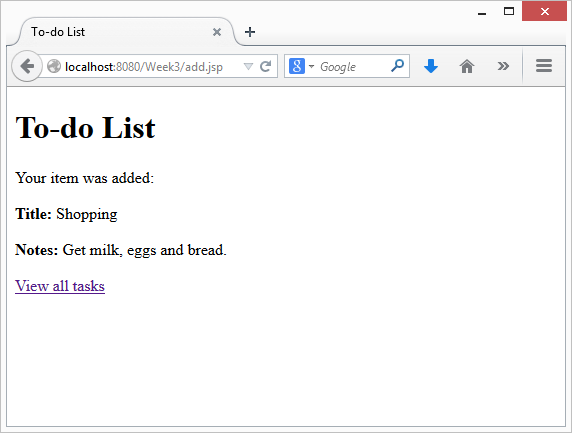
When the user submits the form, the system confirms the new task:
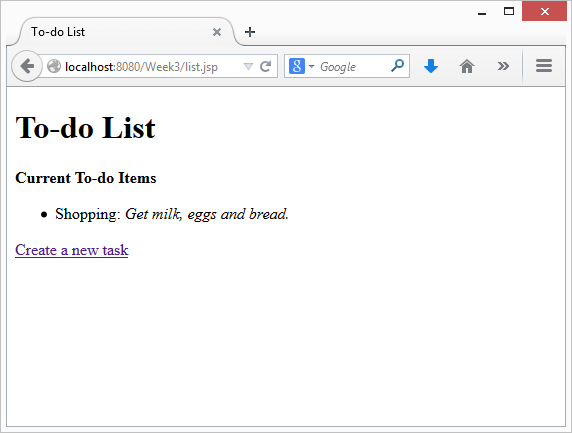
Clicking on "View all tasks" takes us back to the list:
Clicking on "Create a new task" again allows the user to add another new item:

When the user submits the form, the system confirms the new task:
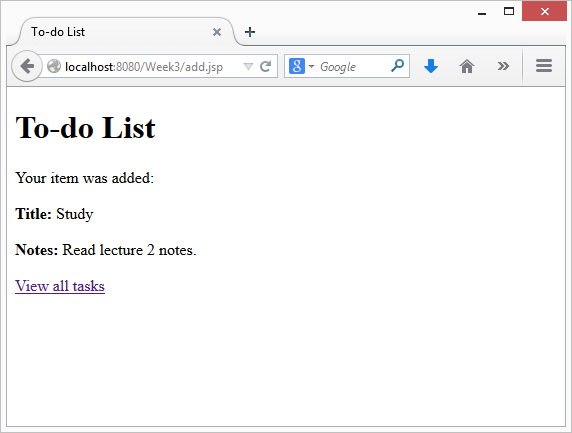
Again, after clicking on "View all tasks", the system shows us all the tasks in the list:
Before we begin, we need to set up the project and helper classes.
HTML screen designs
First, create three JSP files:
- list
- create
- add
Create the HTML for the files. At this stage you do not need to write any JSP/Java yet. Your objective is just to create placeholder HTML that looks something like the screens listed previously.
For example, your list.jsp file might look something like this:
<!DOCTYPE html>
<html>
    <head>
        <title>To-do List</title>
    </head>
    <body>
        <h1>To-do List</h1>
        <p><b>Current To-do Items</b></p>
        <ul>
                <li>Item 1: <i>Notes for Item 1</i></li>
                <li>Item 2: <i>Notes for Item 2</i></li>
        </ul>
        <p><a href="create.jsp">Create a new task</a></p>
    </body>
</html>
After creating the HTML files - you should be able to run your JSP program. Of course, the content of the pages will not be dynamic because because you haven't written any code yet! However, you will be able to check that the generated HTML looks correct and the layout is fine.
Helper Classes
Next, we need to create some "helper" classes in Java: TaskList and Task.
Create a new file:
- Select type "Java Class" (in the "Java" category).
- Name the class "Task" and use package "au.edu.uts.aip.todo" (without quotes).
Repeat the process to create a java class called TaskList (also in the au.edu.uts.aip.todo package).
Copy the source code below into each of the files:
Task.java:
package au.edu.uts.aip.todo;

public class Task {

    private String title;
    private String notes;
    private TaskList taskList;

    public String getTitle() {
        return title;
    }

    public void setTitle(String title) {
        this.title = title;
    }

    public String getNotes() {
        return notes;
    }

    public void setNotes(String notes) {
        this.notes = notes;
    }

    public TaskList getTaskList() {
        return taskList;
    }

    public void setTaskList(TaskList newTaskList) {
        if (null != taskList) {
            taskList.removeTask(this);
        }
        taskList = newTaskList;
        taskList.addTask(this);
    }

}
TaskList.java:
package au.edu.uts.aip.todo;

import java.util.*;

public class TaskList {

    private ArrayList<Task> tasks;

    public TaskList() {
        tasks = new ArrayList<>();
    }

    public List<Task> getTasks() {
        return tasks;
    }

    void removeTask(Task task) {
        tasks.remove(task);
    }

    void addTask(Task task) {
        tasks.add(task);
    }

}
Reflect
Do you understand the Java classes we have just created?
First, we will implement the to-do list using standard JSP tags: <% %> and <%= %>
In this exercise, you need to modify your project in two places:
- Modify list.jsp so that it retrieves (or creates) a TaskList object from the session and lists its contents to the user.
- Modify add.jsp so that it retrieves the submitted form parameters ("title" and "notes"), creates a Task, and saves it to the TaskList object stored in the user's session.
We will be using the helper classes. In JSP, you use the following code to "import" a package:
<%@page import="au.edu.uts.aip.todo.*"%>
You should add this directive to the top of both list.jsp and add.jsp. (Note: page import is one directive, but there are lots of other directives that you can use in JSP).
Now, see if you can figure out the required changes to list.jsp and add.jsp. You should be able to complete the exercise using standard JSP <% %> and <%= %> tags.
Hints (list.jsp)
You should associate a task list with each session. This will retrieve an object from the session:
TaskList taskList = (TaskList)session.getAttribute("taskList");
Remember, that if this is the first time the user has used the application, there is no "taskList" in the session. The result of calling getAttribute could be null. You should check for that case and handle it:
if (null == taskList) {
    // do something to handle no task list
}
To iterate through the tasks in the task list, you can use code like this:
for (Task task : taskList.getTasks()) {
    // handle task
}
Hints (add.jsp)
If your form had a field such as <input type="text" name="title"/>, then you can retrieve the value using:
request.getParameter("title");
This code will add a task to a task list:
Task task = new Task();
task.setTitle("Title goes here");
task.setNotes("Some notes");
task.setTaskList(taskList);
Reflect
What happens if you use HTML inside your form submission? Why?
Create a task with the title "Test" and into the notes input box, enter the text "<script>alert('Hi');</script>" (without quotes). What happens?
Would a graphic designer be able to work with these JSP pages?
How could we reduce the amount of Java mixed inside our HTML?
In this exercise, we will simplify our JSP files using Java Beans and the JSP Standard Tag Library.
There is a lot to learn in this exercise and this is quite challenging. However, the end result looks simple -- all the complexity gets hidden.
Java Beans
A Java Bean is a Java class that follows a number of conventions:
- There is a default no-argument constructor (you can declare the no argument constructor or, if you have no constructors, then a default no-argument constructor is automatically created for you).
- Any properties are implemented using get and set methods (e.g., a "title" property would be implemented as a pair of methods String getTitle() and void setTitle(String))
- The class implements Serializable
You will notice that the Task and TaskList classes that we created follow these conventions:
- Task has properties named "title", "notes" and "taskList"
- TaskList has only one read-only property called "tasks" (it is read-only because it has a getTasks() method but no setTasks(...))
Using Beans in JSP
JSP can automatically create and manipulate Beans without needing to use Java code.
Previously, you might have written code such as the following:
<%
  TaskList taskList = (TaskList)session.getAttribute("taskList");
  if (null == taskList) {
      taskList = new TaskList();
      session.setAttribute("taskList", taskList);
  }
%>
In JSP, such code can be replaced by the following:
<jsp:useBean id="taskList" class="au.edu.uts.aip.todo.TaskList" scope="session"/>
This tag tells JSP to retrieve taskList from the session. It will create a new instance of the bean if one does not already exist.
There are several possible scopes you can use with jsp:useBean:
- page (a new bean will be created in each JSP page involved in a single request)
- request (a new bean will be created in each request)
- session (a new bean will be created for each new session but reused across pages)
- application (a new bean will only be created once across the entire application and reused across all sessions and pages)
For more information about the jsp:useBean tag and meaning of each of these scopes, click here.
After using the jsp:useBean tag, the bean can be accessed in two ways:
- In a scriptlet on the page (e.g.,
<%= taskList.getTasks().size() %>) - As an attribute of the appropriate scope object (e.g.,
session.getAttribute("taskList")).
JSP can also automatically set a property of a Bean using parameters passed in from a form:
<jsp:useBean id="task" class="Task" scope="request"/>
<jsp:setProperty name="task" property="title" param="title"/>
The <jsp:setProperty name="task" property="title" param="title"/> tag is equivalent to the following Java code:
<%
  String param = request.getParameter("title");
  task.setTitle(param);
%>
Note that property="title" in the form submission is automatically translated into a setTitle(...) method call for you.
Expression Language
Expression language (EL) is a convenient way to access attributes of a page. It can be used as a replacement for JSP expressions.
Here are some simple JSP expressions and their EL equivalent:
<%= 3 + 2 %>becomes${3 + 2}<%= session.getAttribute("taskList") %>becomes${sessionScope.taskList}or just${taskList}<%= ((TaskList)session.getAttribute("taskList")).getTasks() %>becomes${taskList.tasks}<%= request.getParameter("title") %>becomes${param.title}
Note that we can also use Expression Language elsewhere in JSP. For example,
<jsp:setProperty name="task" property="title" param="title"/>
is equivalent to:
<jsp:setProperty name="task" property="title" value="${param.title}"/>
(The difference is that the first one uses the param named title, but the second one uses the value of ${param.title}: they're just two different ways of saying the same thing)
Converting add.jsp to use Beans
You now have enough information to modify add.jsp:
-
Declare two beans with jsp:useBean:
- a TaskList in the session scope
- a Task in the request scope
-
Set the title and notes attributes of the task, based on the form parameters (that come from create.jsp).
-
Use jsp:setProperty to set the taskList attribute of the task (i.e., use jsp:setProperty to call task.setTaskList(...)).
-
You can use Expression Language to pass in the TaskList from the session scope:
e.g.,
<jsp:setProperty name="??????" property="taskList" value="${sessionScope.??????}"/>
(replace the question marks, as appropriate). -
Replace any JSP expressions (
<%= %>) with the equivalent in Expression Language.
Test your modified add.jsp and make sure that it works.
JSP Standard Tag Library
The JSP Standard Tag Library is a collection of tags that perform common tasks in JSP: iteration, branching, formatting.
For example, instead of JSP code such as the following...
<%
    for (Task task : taskList.getTasks()) {
%>
       <p>html goes here</p>
<%
    }
%>
...we can use a JSTL tag such as the following...
<c:forEach var="task" items="${taskList.tasks}">
    <p>html goes here</p>
    <p>you can also use Expression Language here to refer to ${task}</p>
</c:forEach>
To use the JSTL, you first need to import the tag library. You do this by adding the following directive to the top of a JSP page:
<%@taglib prefix="c" uri="http://java.sun.com/jsp/jstl/core" %>
Some of the tags provided by the JSTL are as follows:
<c:forEach>works like a "for" statement in Java<c:if>and<c:choose>work like an "if" statement in Java<c:url>encodes a URL (i.e.,response.encodeURL(...))<c:out>outputs a value, performing any escaping that may be required
To see a more comprehensive list, click here.
Converting list.jsp to use Beans and the JSTL
You now have enough information to modify list.jsp:
- Declare a TaskList in the session scope with jsp:useBean
- Iterate through the TaskList using a tag from the JSTL
- Replace any JSP expressions (
<%= .... %>) with the equivalent Expression Language expression
Conclusion
At this stage, you should check to make sure that you have no more Java code in any of your JSP files.
Reflect
Are your JSP files simpler?
Do you think this code easier to manage and verify?
What happens if you use HTML inside your form submission? Why?
e.g., Create a task with the title "Test" and notes "<script>alert('Hi');</script>".
Does your JSP code work with cookies disabled?
Escaping Text and Encoding URLs
Instead of using ${task.title}, you can use the <c:out> JSTL tag to properly escape any special characters.
Try replacing code such as ${task.title} with <c:out value="${task.title}"/>.
What happens now if you enter HTML inside your form submission?
You can also use the <c:url> tag to create links within the same website that will work with cookies disabled (the created link gets saved for expression language):
<c:url var="somepageEscaped" value="somepage.jsp"/>
<a href="${somepageEscaped}">This is a hyperlink</a>
Test your application with cookies disabled in the browser.
In this exercise, you will convert the to-do list application once more. This time, you will use a Model 2 / MVC architecture.
In an MVC architecture, we need a Model, a View and a Controller:
- Our model has been created: the TaskList and Task classes
- Our views will be written using JavaServer Pages
- Our controller will be implemented as a Servlet
In a MVC architecture, we should not have any domain logic in the views.
We have already eliminated most of the domain logic except for the jsp:useBean and jsp:setProperty tags. Our objective is therefore to move the logic for jsp:useBean and jsp:setProperty into a Servlet.
Create a Controller Servlet
Create a new Servlet called TodoServlet in the au.edu.uts.aip.todo package. You may wish to set it to respond to a more user-friendly URL pattern such as "/todo" instead of "/TodoServlet".
Modify the Servlet so that any request is forwarded to the list.jsp page:
request.getRequestDispatcher("/list.jsp").forward(request, response);
Now you can access your Servlet (i.e., save, and open http://localhost:8080/Week3/todo or http://localhost:8080/Week3/TodoServlet in your browser).
What happens? You should see the output of list.jsp as though we had accessed the JSP file directly.
Move logic for list.jsp into the Servlet
Now return to the list.jsp file and delete the jsp:useBean tag.
You can now implement the jsp:useBean functionality of list.jsp inside your Servlet.
Hints
You can pass information from your Servlet to your JSP view by using setAttribute(...).
For example, you can call session.setAttribute("taskList", taskList), then access the task list using Expression Language as ${taskList} or ${sessionScope.taskList}.
You can also use request.setAttribute("someNameGoesHere", object) and this is accessible from Expression Language as ${someNameGoesHere} or ${requestScope.someNameGoesHere}.
Create a Front Controller (or multiple Controllers)
So far we have converted list.jsp into a Model 2 MVC style architecture. The next task is to convert add.jsp and create.jsp.
There are at least two ways to do this:
- Create a separate Servlet for each JSP
- Use one Servlet to handle every request
The second approach is more complex but leads to a slightly better design because it allows you to decouple views from page URLs. In other words, with the second approach you can have one request generate different views according to the application logic.
One common approach used in the "Front Controller" pattern is to have a parameter to identify the action. That is, with every request, the URL includes a parameter called "action" or "command". The Servlet examines the value of the parameter and chooses the appropriate action to perform.
For example, in the Servlet you may have code such as the following:
String command = request.getParameter("command");
if (null == command) {
    // handle no command
} else if ("list".equals(command)) {
    // handle the list command
} else if ("create".equals(command)) {
    // handle the create command
} else if ("add".equals(command)) {
    // handle the add command
} else {
    // handle an unrecognized command
}
Then, instead the URLs used in the application would be modified as follows:
-
http://localhost:8080/Week3/list.jsp
would become
http://localhost:8080/Week3/todo?command=list -
http://localhost:8080/Week3/create.jsp
would become
http://localhost:8080/Week3/todo?command=create -
http://localhost:8080/Week3/add.jsp
would become
http://localhost:8080/Week3/todo?command=add
Your challenge is to convert the to-do list application to a Model 2 architecture.
Reflect
Is the Model 2 to-do list application now simpler or more complex?
If it is more complex, is the additional complexity a benefit? In what situations would it be a benefit?
What happens if the user bypasses the Servlet, and attempts to load the JSP directly? (i.e., the user opens http://localhost:8080/Week3/list.jsp instead of using the Servlet)
Securing Views
The application server automatically serves any files in the "Web Pages" (or "web") section of your NetBeans project. This can be a problem if the JSP views need the Controller Servlet to set up the page first.
One way to make the views "private" is to move them to the WEB-INF folder. Any content inside WEB-INF is inaccessible to the user and can only be delivered to the user by forwarding their request through the request dispatcher:
request.getRequestDispatcher("/WEB-INF/list.jsp").forward(request, response);
You should move the views into the /WEB-INF folder, make any necessary changes to your Servlet(s) and check that your application still works.
This last exercise will not be covered in the tutorial but it can be done in your own time.
Removing Duplicated HTML
Your JSP views probably have several repeated elements.
For example, perhaps the HTML of every page looks something like this:
<!DOCTYPE html>
<html>
    <head>
        <title>To-do List</title>
    </head>
    <body>
        Main content goes here
    </body>
</html>
Many sites have a common header (e.g., company logo, CSS stylesheets, menu bar) and a common footer (e.g., copyright notice, site map, contact address). It is inconvenient to change this information in every file.
JSP allows you to reduce the amount of duplication. You can move the common HTML elements into separate files. These files can then be automatically included in your output.
There are several approaches to including other files:
- Include the other files
- A static include using
<% include file=""%> - A dynamic include using
<jsp:include page=""/>
- A static include using
- Import another URL using JSTL
<c:import url=""/>
- Configure a common header and footer in web.xml
<include-prelude>and<include-coda>
- Create a custom tag file
For more information and examples, look at the first answer to this question on Stack Overflow: https://stackoverflow.com/questions/14580120/whats-the-difference-between-including-files-with-jsp-include-directive-jsp-in
You can now improve your to-do list app by moving common code from each of your JSPs into separate "template" files.